

シリーズの最後から 2 番目の記事では、Gaziano & Girling のオーダーメイド靴のプロセスと生産について説明します。この部分は、最終的なペアの生産に続きます。私自身、すべてを記録するためにノーサンプトンで 1 週間過ごしました。
オーダーメイドのオーステリティー ブローグを注文したのは、ほぼ 1 年前のことです。 ガジアーノ &ガーリング Savile Row にある彼らの店で パート1はこちら), then I had a first fitting in Stockholm at Skoaktiebolaget (read パート2はこちら), and at the second fitting only minor changes was left to do on the lasts (read パート3はこちら). その後、私は実際に最初の本物の靴を作ってもらいましたが、機械縫いのラバーソールを使用していました。そのような靴が非常に必要だったので、元の注文が完了する前にオスにすることにしました。このように、3 つのフィッティングがあったと言えます。この後も、いくつかの小さな変更点がありました。特に、小指がややきつく、足の指の付け根のすぐ後ろに空気がありました。さらに、つま先の非対称性を少し減らしたいと考えていました。

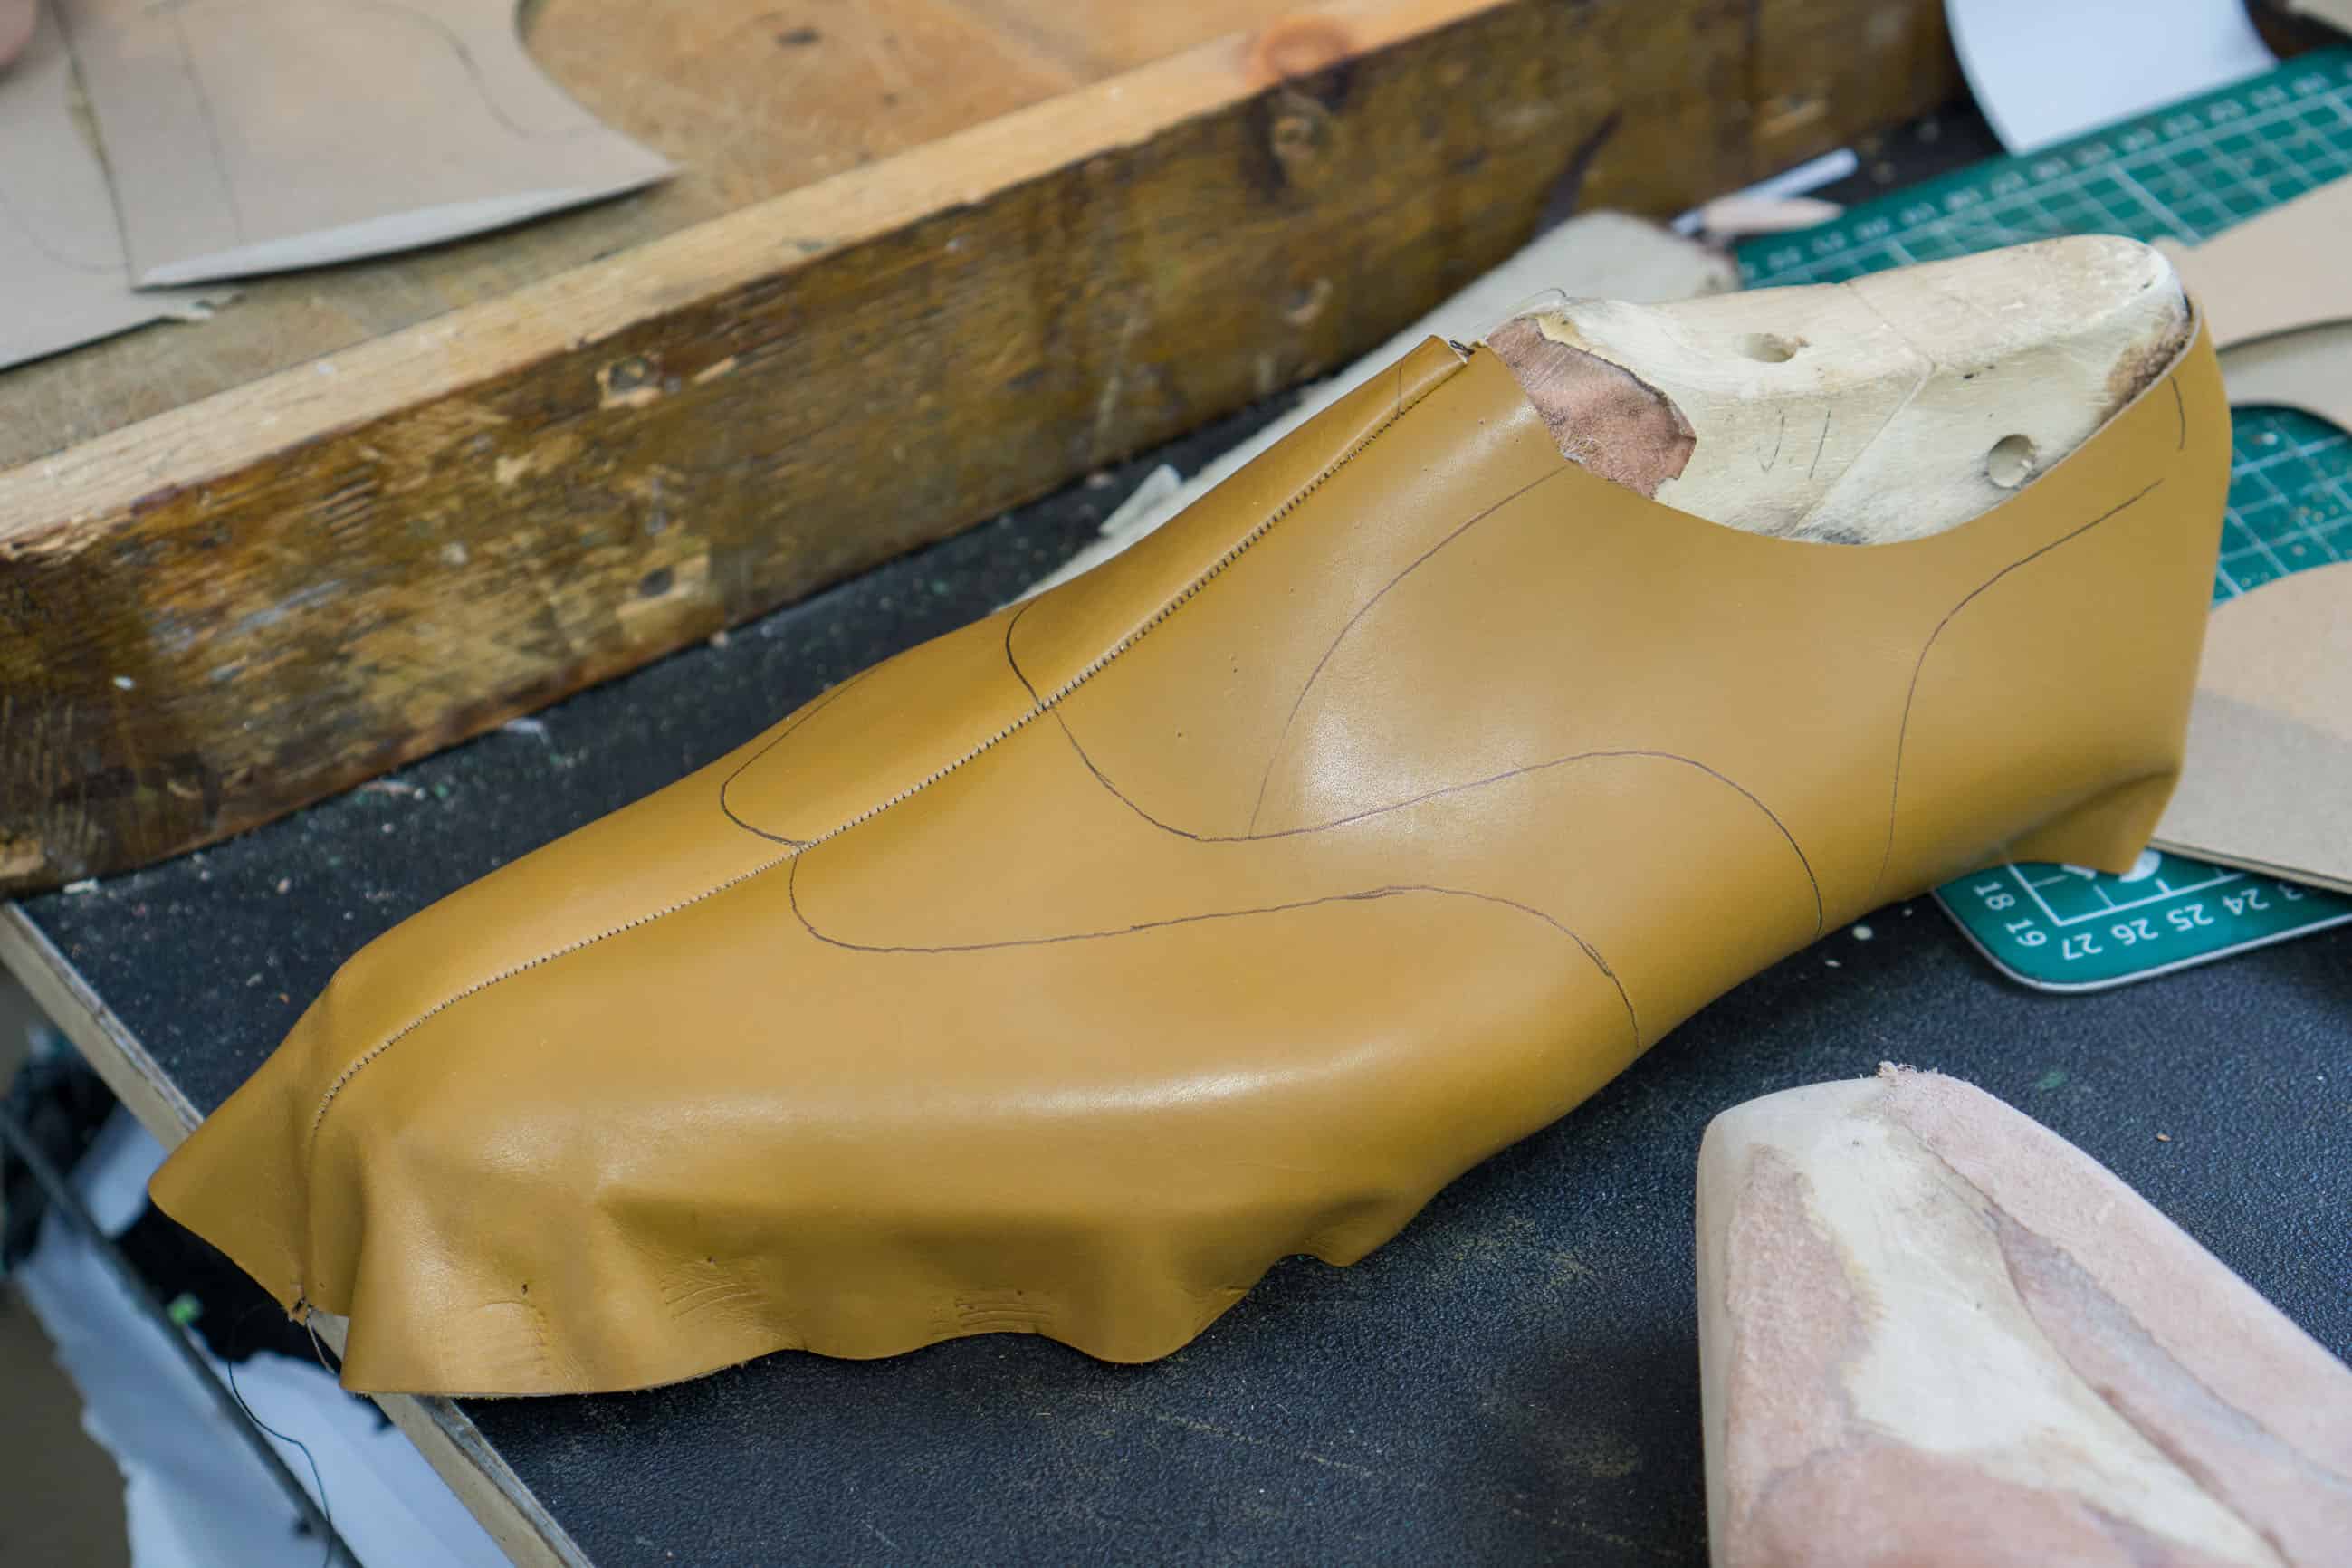
最初の本物の靴となったラバー ソールのペアは、いわゆるスワン ネック オックスフォードでした。ここではアッパーが持続されています。

ラバーソールの方がはるかにうまく機能するため、これらのソールを機械で取り付けました。

完成したペア。
しかし、この記事シリーズで追うのはオーステリティ ブローグなので、それは私たちが続けていることです。前述のように、私は先週、ノーサンプトンのケタリングで過ごし、スウェーデン人のダニエル ウェガンの最終的な靴の製造に関する作業を追跡しました。ダニエルはオーダーメイド部門の責任者であり、ラストメーカーでもありますが、彼の「余暇」にブランドの制作の大部分を行っています.ブログに良い記事を書けるようにするためでもあったのは明らかですが、主な目的は、自分自身でもっと詳しく知りたいという興味からでした。私は、スウェーデンのオーダーメイドの靴職人である Janne Melkersson の靴作りのコースで 1 週間を過ごしました。これは非常にやりがいがあり、食欲をそそりました。前述したように、靴の作り方を学ばなければならないということではありません。靴がどのように作られているかをできる限り学びたいだけです。 Janne を訪問したとき、2 つの非常に長いブログ投稿で制作のプロセスを徹底的に文書化したため (残念ながら、スウェーデン語版でのみ利用可能です。こちらのパート 1 と パート 2 はこちら。今後翻訳される可能性があります)、今回は写真に焦点を当てて詳細を少し減らします。
Janne を訪問した後に書いたように、手作りの靴を作るために必要な膨大な数のステップ、特にさまざまなパーツの絶え間ない準備には多くの時間がかかり、魅力的です。たとえば、ウェルトの手作業による縫製は、両方の靴で 1 時間強で完了します。靴の内側に沿って走る革のサイド補強材を準備するだけでも、同じくらいの時間がかかります。ダニエルによると、多くの点で、この部分がウェルト シームよりもしっかりと作られていることがはるかに重要です。例を挙げると。
ダニエル(または他の誰か、この場合はクリッカーとクローザー)が実際に靴で作業した実際の時間を記録しました.合計で約 40 時間の具体的な作業時間が費やされました。これは、最終的な靴の完成、足の測定と注文の受付、靴型の作成、最初の試着靴の製造、試着、靴型の修正、および 2 回目の試着のためのこの手順の繰り返しのためだけの時間です。ダニエルは、私の靴の場合、これに約 60 時間かかったと見積もっています。したがって、誰かが実際に何らかの形で靴を扱った総生産時間 (さまざまな乾燥ステップなどのために休む時間をすべて数えない) は、合計 100 時間になります。
比較として、Gaziano & Girling が計算したところによると、誰かが工場で RTW シューズのペアに取り組んでいて、実際にそれらを持っていて、手作業またはすべての機械のいずれかで何かを行っている場合、1 ペアは約 35 です。 -40分。もちろん、そのような比較を行うのは完全に公平ではありません (たとえば、RTW の靴型はすでに製造されている、使用される機械は信じられないほど高価である、すべてのスタッフ、施設のレンタル、ロジスティクス、およびペアのコストに含まれるその他の多くの費用)工場で作られた靴の数も考慮に入れる必要があります)が、いずれにせよ、このタイプのオーダーメイドの靴の価格が高いのは不合理ではないと言っても過言ではありません.
これが、このウォークスルーでプロセスの詳細を省略した理由でもあります。実際にどれだけの作業が行われたかを正確に示すことは困難であり、非常に退屈になる可能性もあります。たとえば、材料が切断または研磨される繰り返しのラウンドであるため、すべてを表示するのは面倒です.とはいえ、下には 130 を超える画像があります (画像をクリックすると拡大版が表示されます)、お楽しみください!

スワンネックオックスフォードシューズの後に少し修正されたファイナルラスト。
パターンは最後のフィッティング後に変更されているため、適切にテストする必要があります。こちらは、2枚の革を縫い合わせて模様を付けただけで作った最初のバージョンです。

次に、使用するパターンピースの切り取りを開始します。 Daniel Wegan はこれに薄いボール紙を使用します。
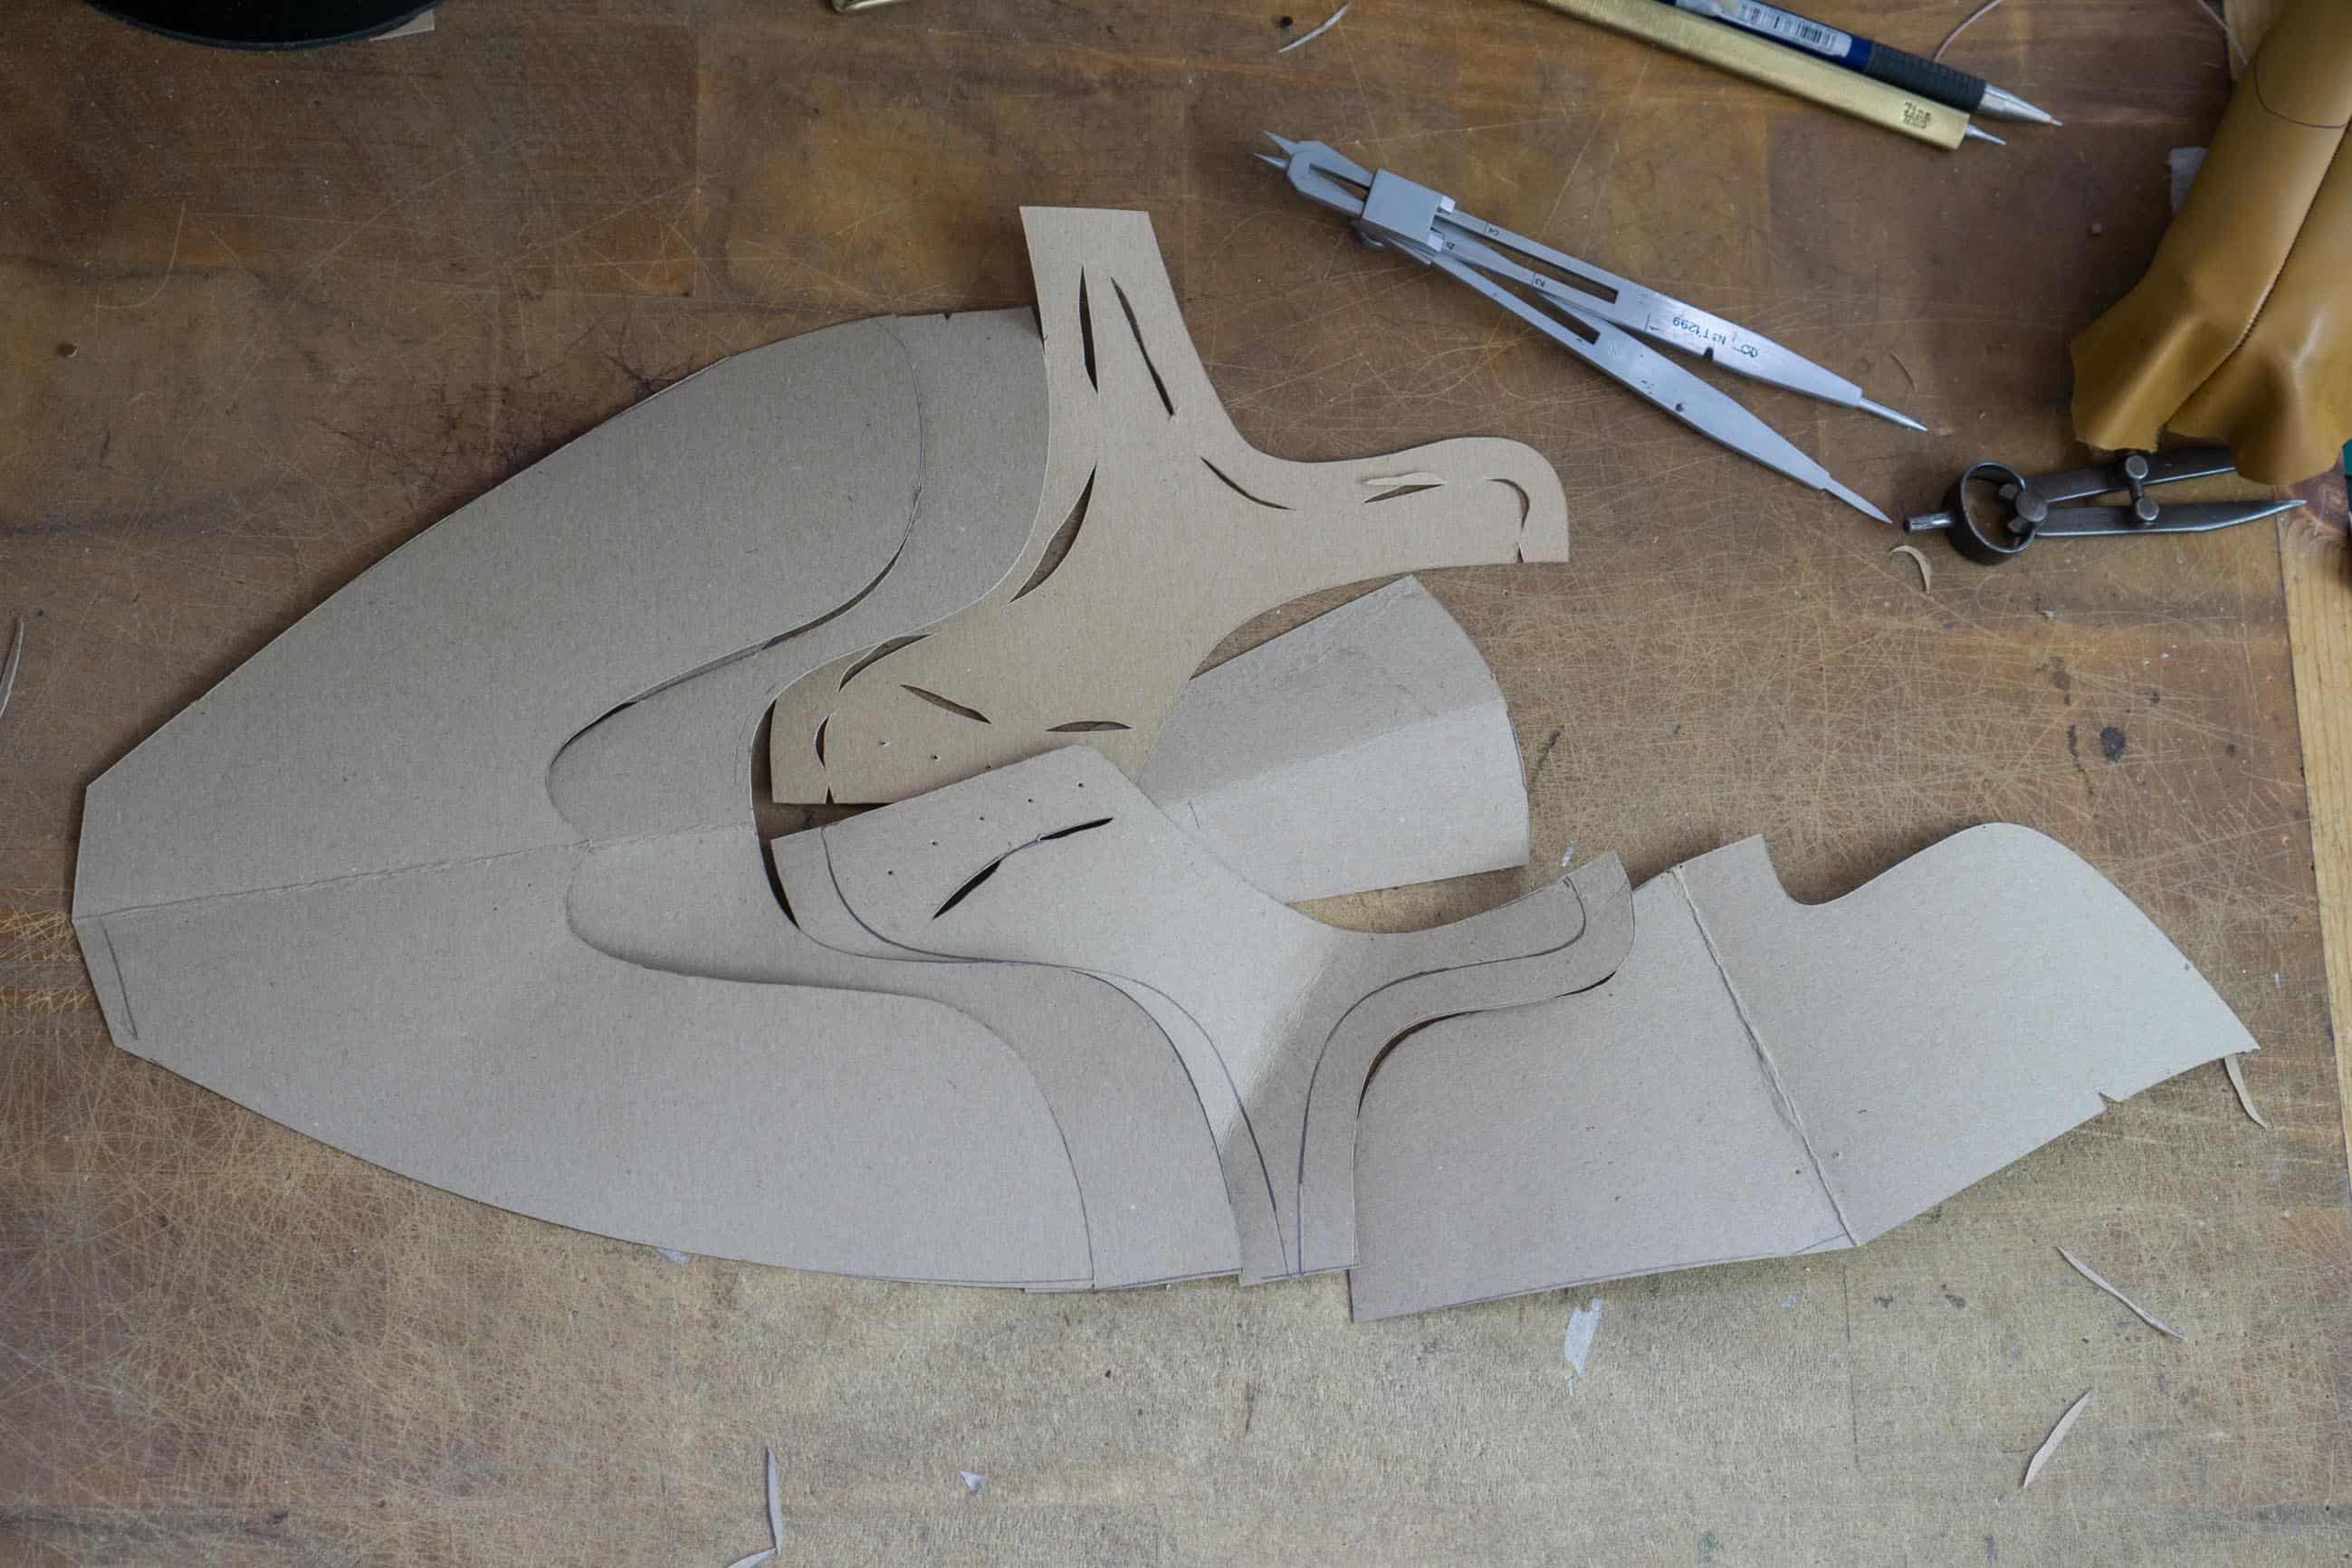
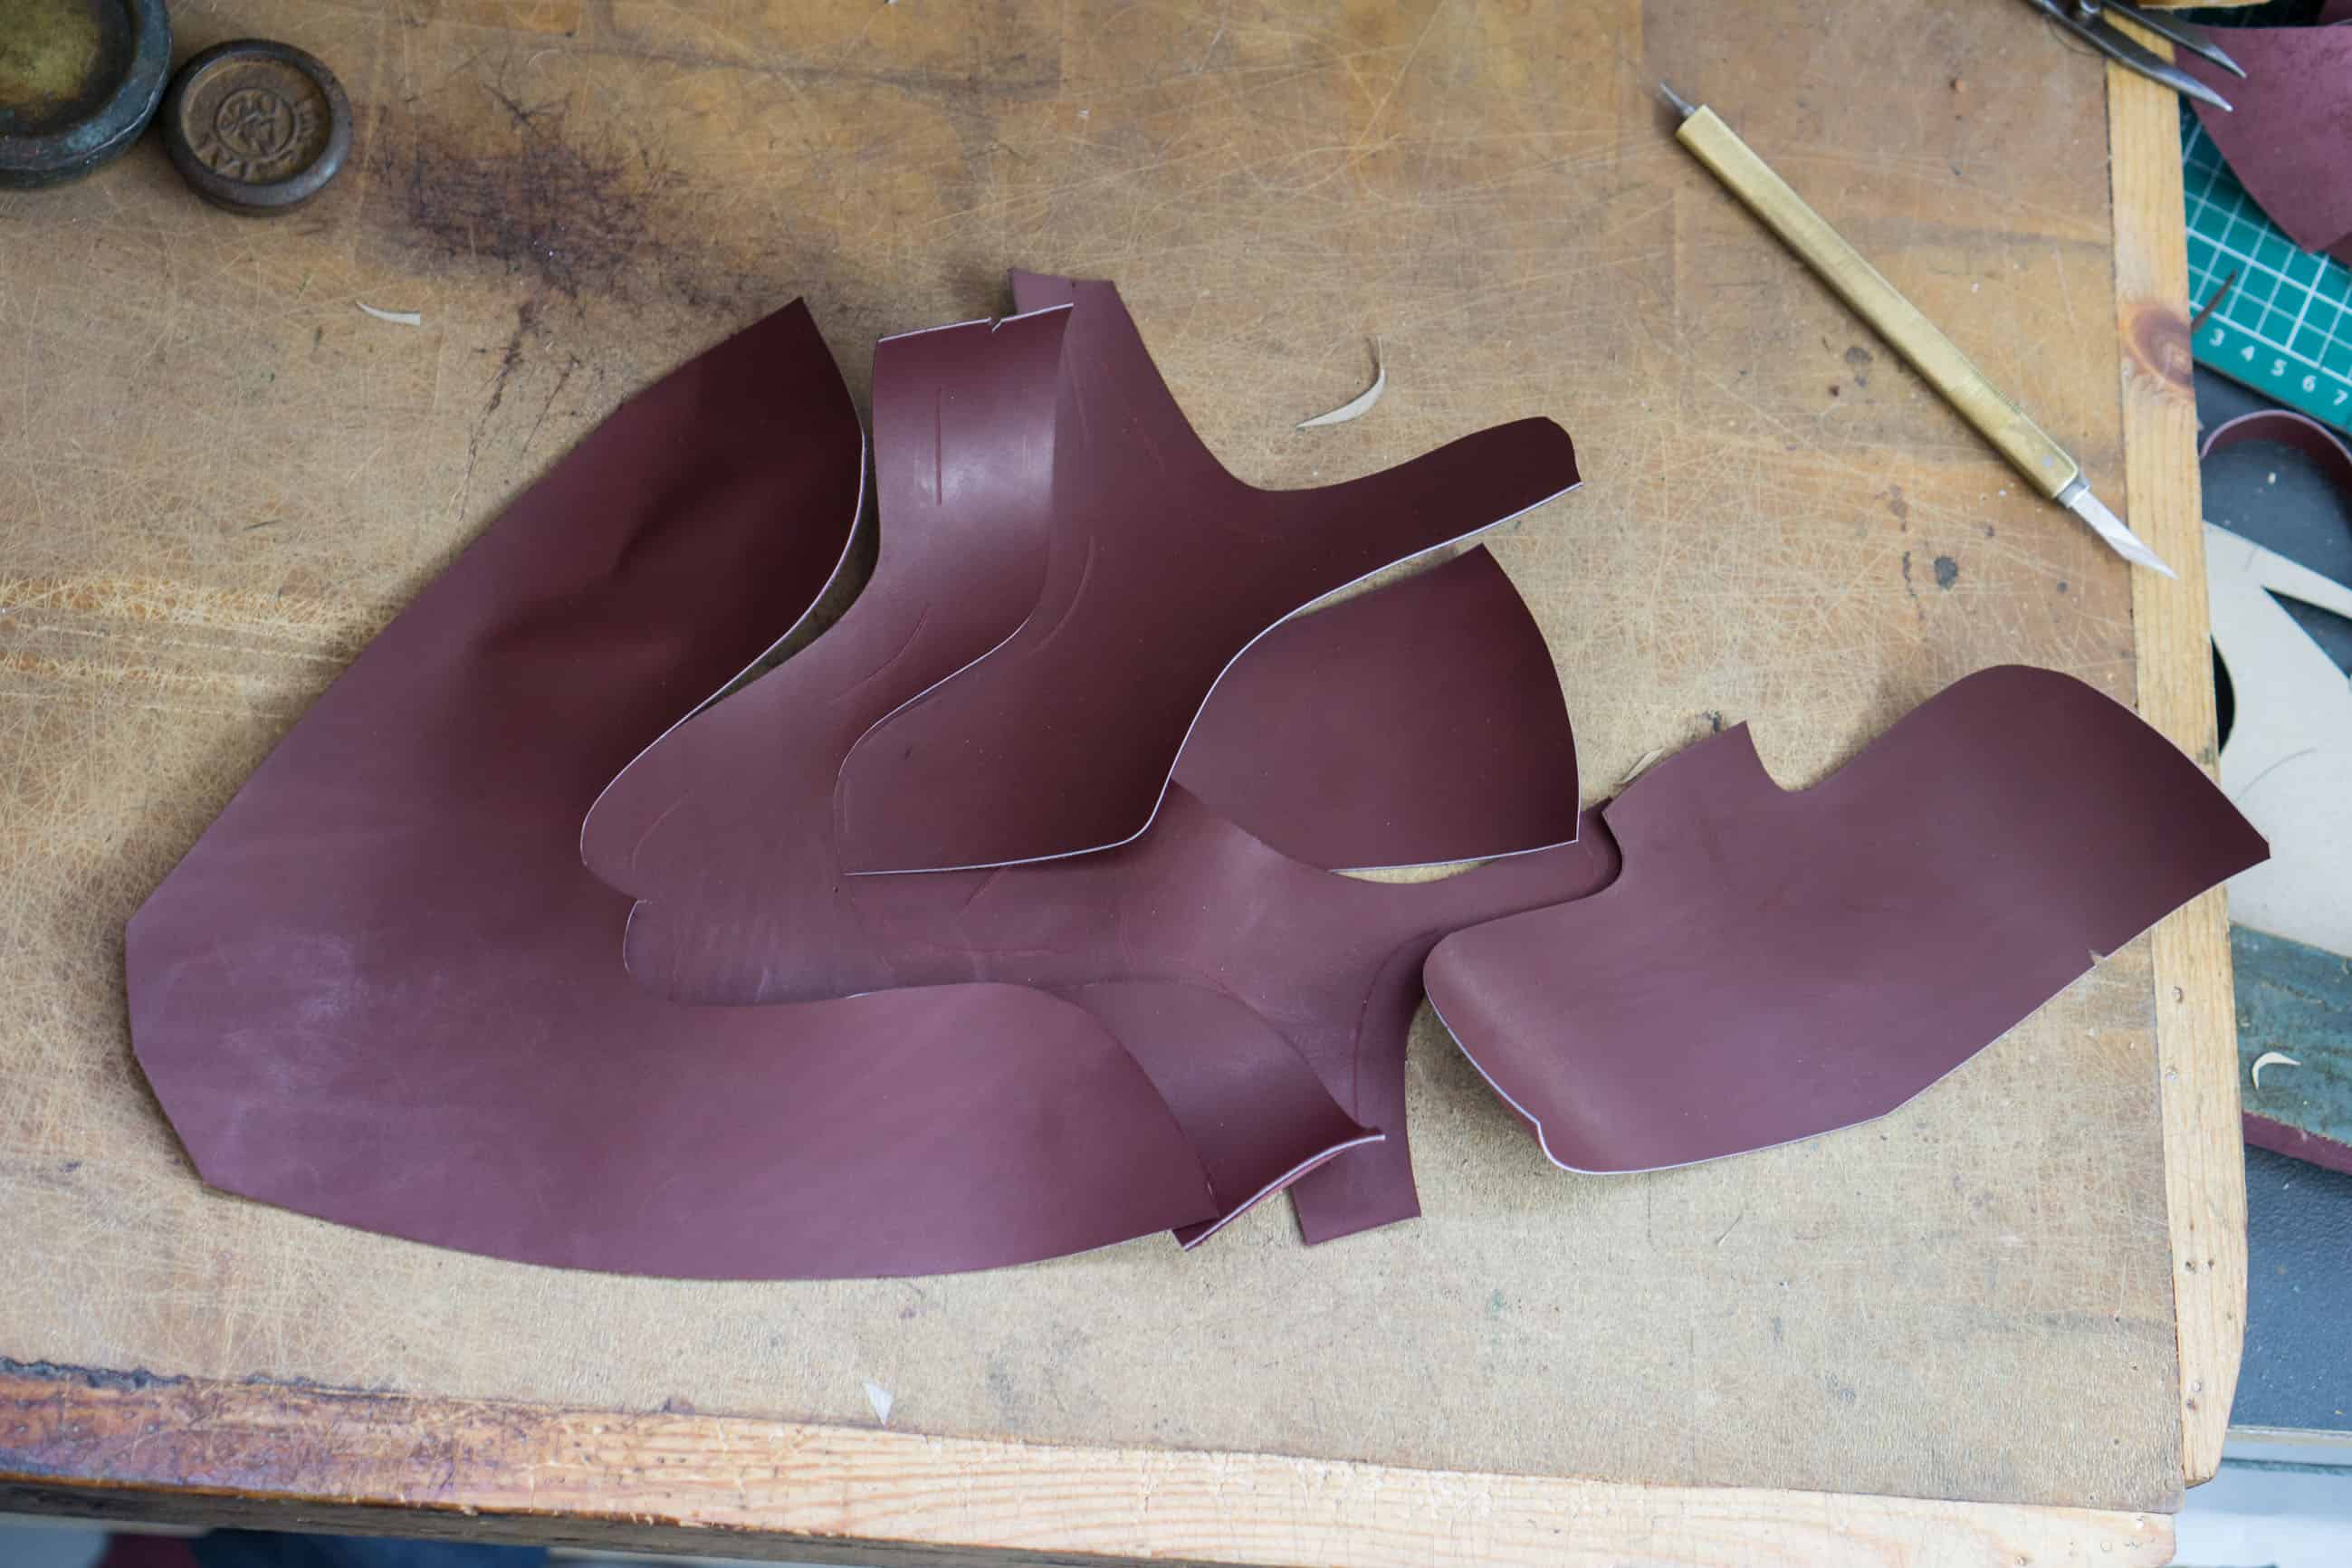
パターンのすべての部分。
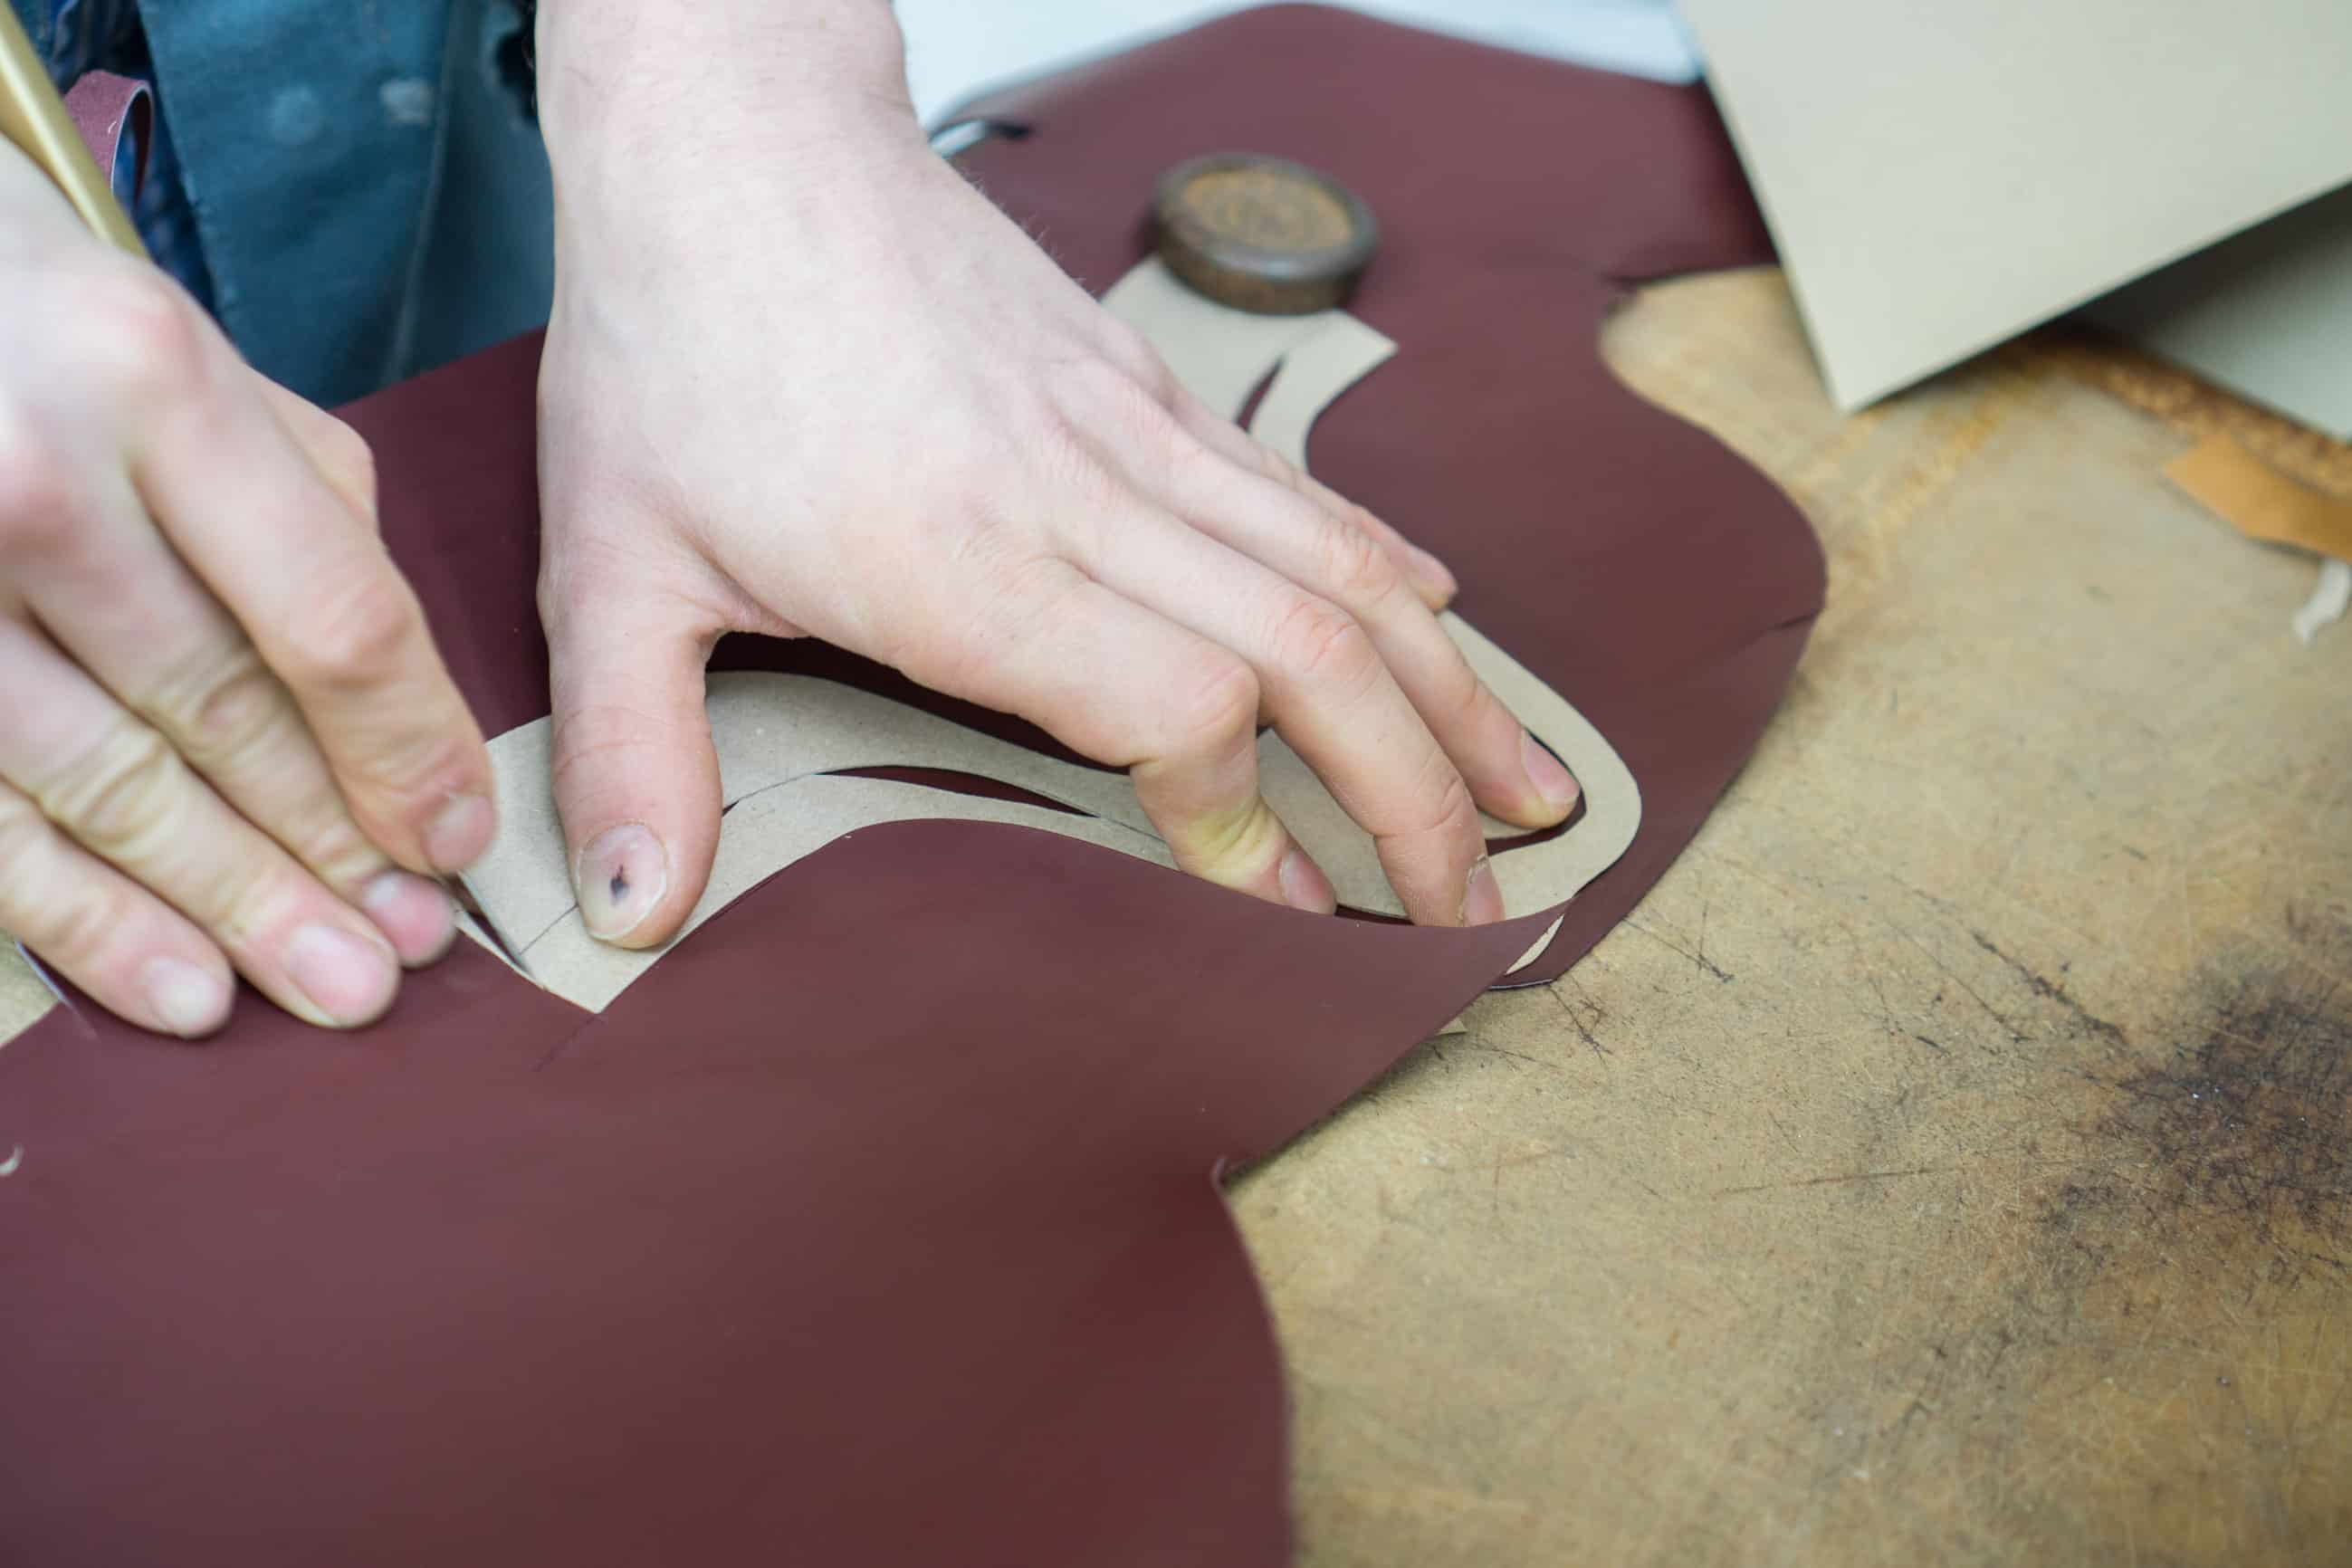
次に、アッパーがスクラップレザーで作られているパターンの適切なテストが行われます。最終的なペアを始める前に、パターンが完璧であることを 100% 確認したいので、実際のアッパーを処分するリスクはほとんどありません.
今回もすべてのパーツがスクラップレザーです。

ミシンで縫い合わせる前に、端をそぎ落として接着します。ダニエル ウェガンがアッパー ステッチを少し練習する機会(靴作りの一部であり、彼はまだ特に上手に習得していません)。

パターンは最後にテストされます。靴ひもが靴型の中心から少しずれているように見えたため、少し修正する必要があることが判明しました。したがって、パターンの新しいテストは、今説明したのとまったく同じ方法で行われましたが、このウォークスルーではスキップします。

パターンのデザインが完全に終了すると、最終的なペアの生産が開始されます。今、私たちはクリッカーが皮を調べて本当に良いものを見つける裁断室にいます.

次に、皮膚を注意深く検査し、パーツをカットするときにこれらを避けることができるように、すべてのマークとスクラッチをマークします。

靴のパーツ (シュータンを除く) が最適に配置されています。クリッカーにとって複雑な作業は上のこの部分です。革を最大限に活用するために、部品の切断はそれほど複雑ではありません。私の靴では、クリッカーはパーツを大まかにカットするだけで、その後ダニエルが実際にカットしました。

ここで難しいのは、カットをできるだけ真っ直ぐにしたいということです。これには、ブレードを動かす方法と、より大きなターンまたは同様のターンのときにパーツを動かす方法の適切な流れが必要です.

まず、重なり合うエッジをスカイビングマシンでエッジに向かって薄くします。 Daniel Wegan は、完全に手作業で行った場合よりも、機械で作成した方が結果が滑らかで優れていると感じています。

機械で削りました。

ただし、スカイビングは、後で必要な場所で手動で改善されます。

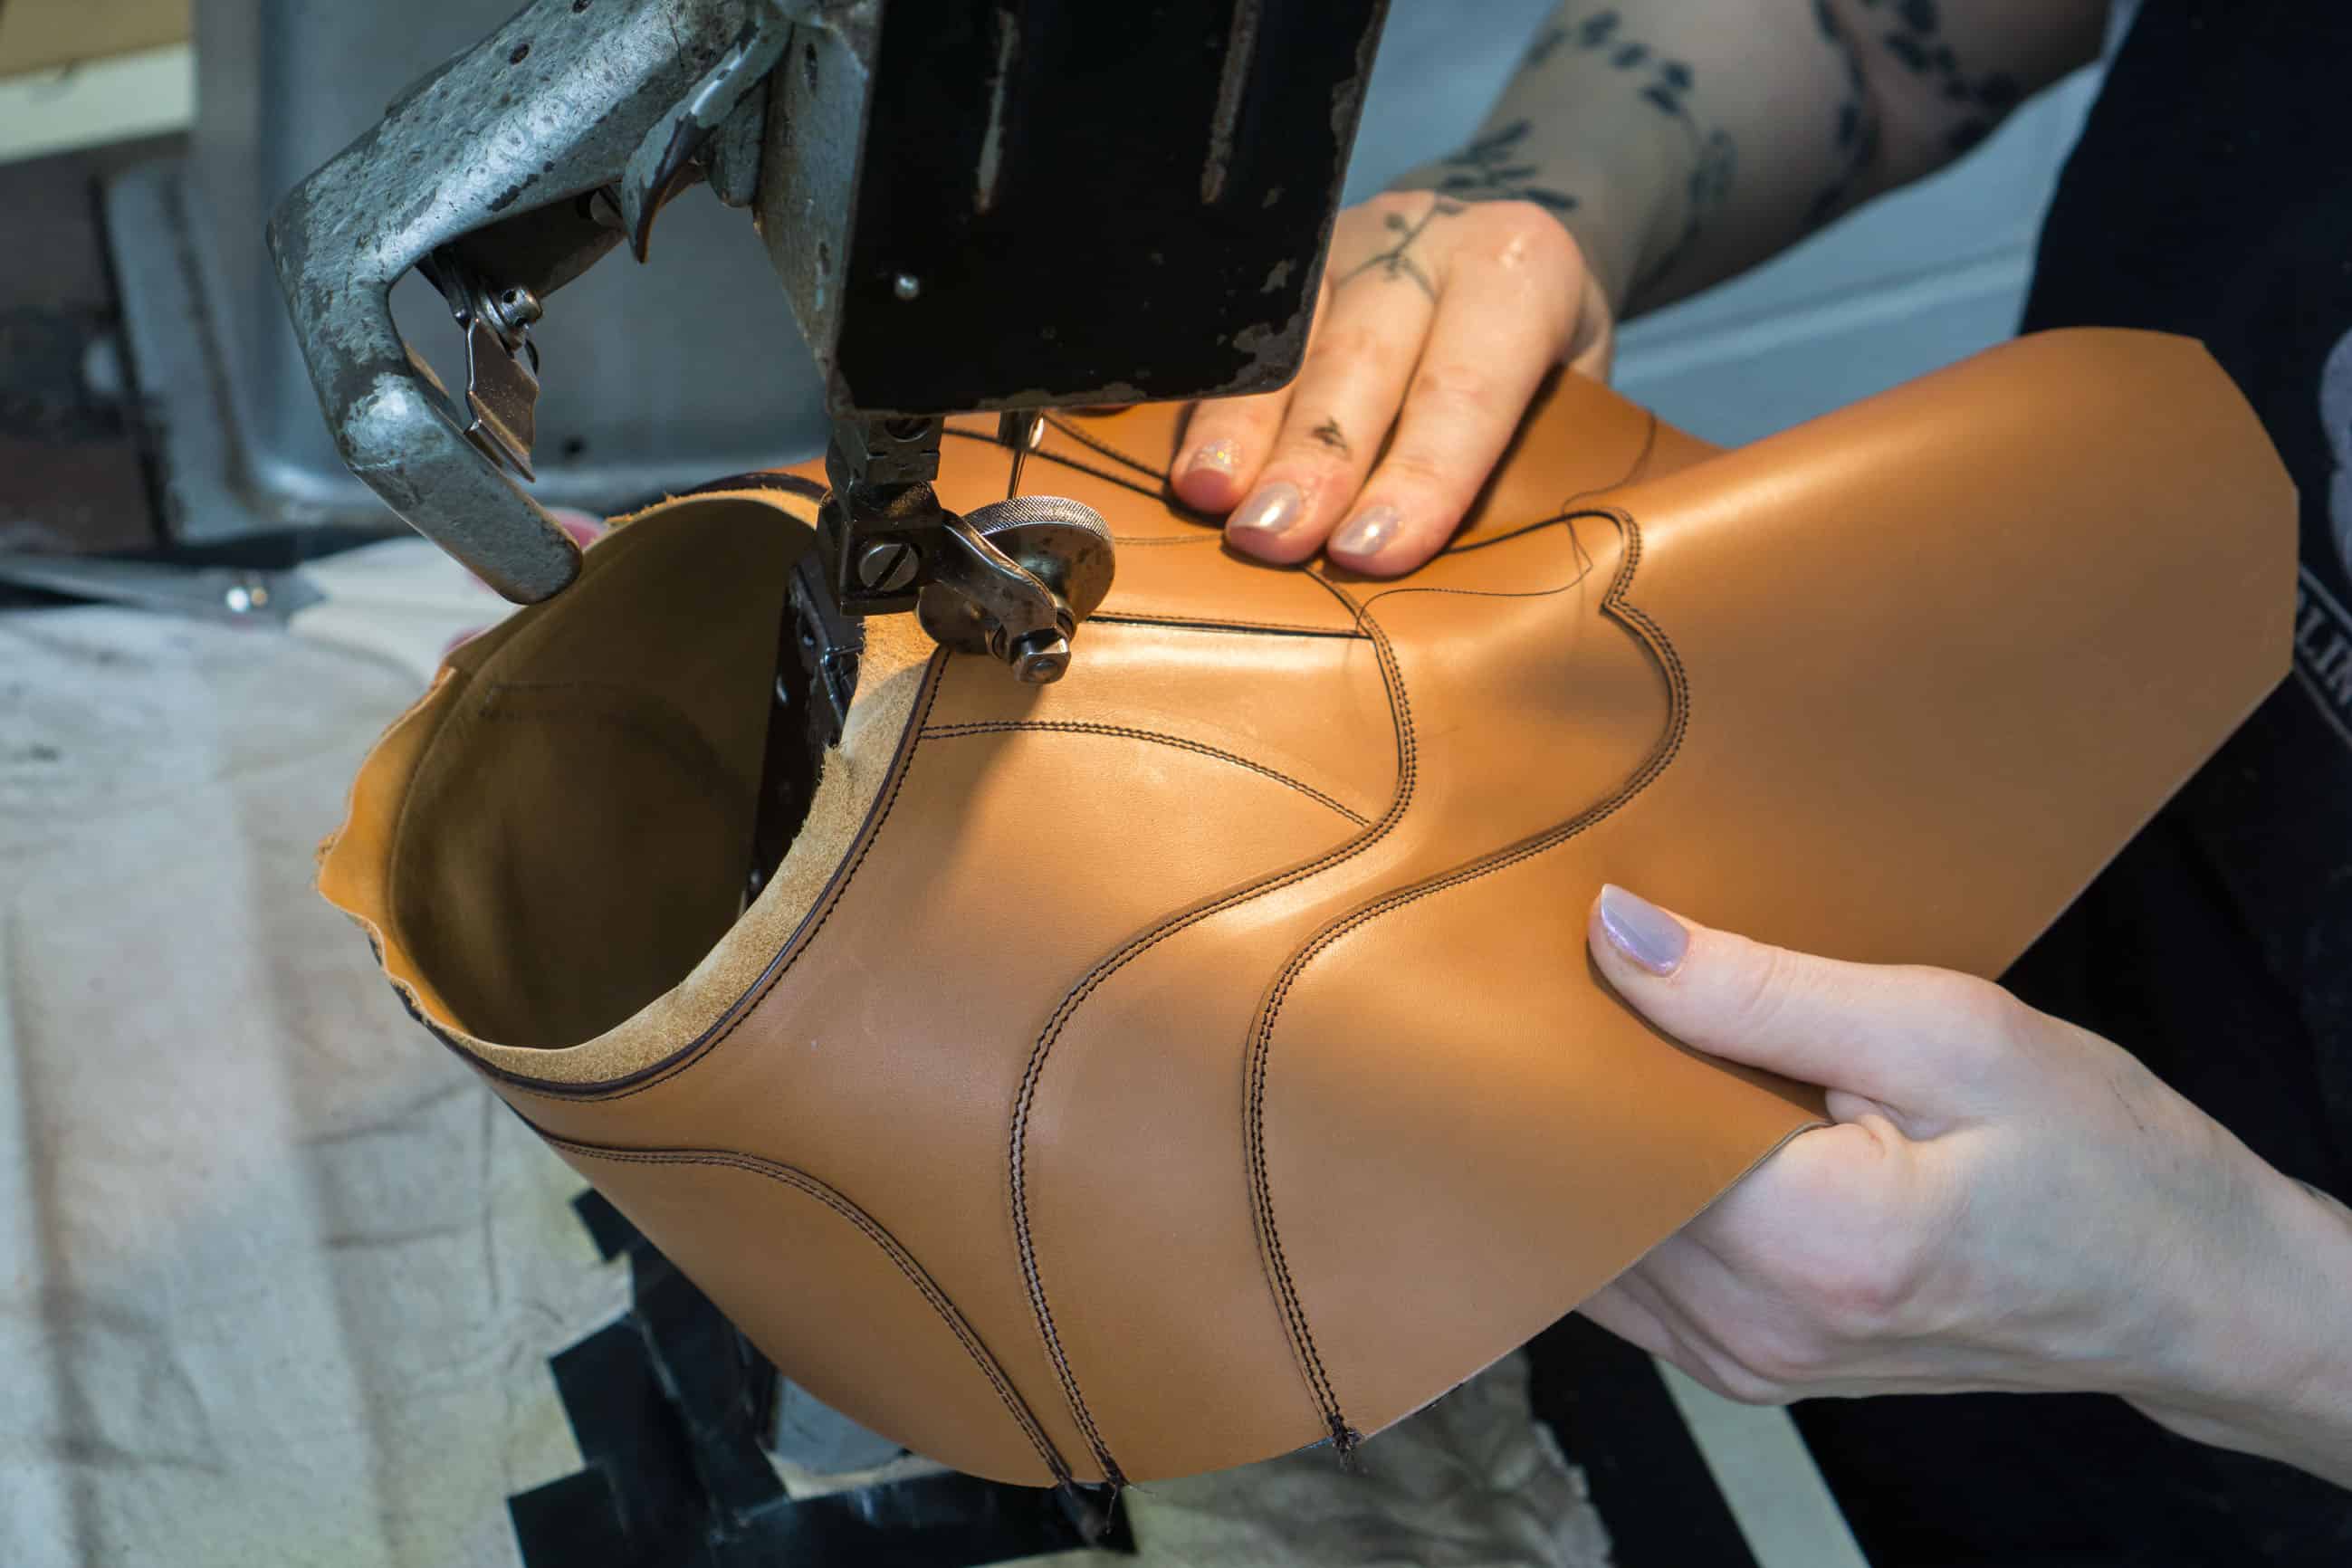
現在、パーツはガジアーノとガーリングのヘッドクローザー、ケイに引き渡されています。最初に彼女は革の染料でエッジをペイントします。これは、上のように見える革は染色されていないためです。ここでペイントすることが、エッジが適切に覆われるようにするための最良の方法です。その後、縫いやすいように接着剤で接着し、次にミシンでパーツを組み合わせていき、さまざまな補強材を取り付けていきます。こちらは開口部が伸びないように補強テープを貼っています。

ミシンで。私は二列のステッチを選びましたが、ジンプ(ブローグの靴によく見られるギザギザのエッジ)はありませんでした。また、直接そこにいたので、開口部でどのような補強を行うかなども選択できました。配管を選択し、それがどれだけ表示されるか.

アッパーは閉め終わりました。 Daniel Wegan は、同社の RTW シューズとは異なるビスポーク シューズのアッパーを仕様しています。たとえば、この段階では布地の補強材をあまり使用せず、代わりに後で革の補強材を入れます。また、端のテープは、アッパーが長持ちするときに強度を与えるためのものです。

ライナーは、靴の内側のエッジを最小限に抑えるために、通常 1 枚の革で作られたオーダーメイドの靴にあります。ただし、そのため、はめ込むのが少し難しくなります。
ここでは、裏地がアッパーに縫い付けられています。これは、常に開口部の上部にある縫い目です。裏地はトリミングされ、フェーシングで開かれますが、靴が長持ちするときに後で作業する必要があるため、かかと部分は保持されます.

靴にはダークブラウンのパティナが施され、ライニングの汚れを防ぐために、クロージング前にシュータンがペイントされます。

アッパーが完成しました。舌は裏地だけで縫い付けられており、動きを防ぐために側面の縫い目が少し上がっています.裏地の舌の底に見える黒い点は、不快感を与えないように端を焼き払った補強の縫い目です。

現在、上部の革に水と柔軟剤の混合物をスプレーして、長持ちする間に革をできるだけ節約しています。

アッパーはダニエル・ウィーガンが履いています。背景にいるのは、Gaziano & Girling のオーダーメイド部門の 2 番目のスウェーデン人である Andreas Reijers です。

この耐久性は、アッパーが実際にフィットすることを確認し、靴型の後に少し形を整えるための暫定的なものです。

インソールは早い段階で靴型でブロックされています。厚いベジタブル タンニンなめしの革は完全に浸され、大まかにトリミングされ、靴型に取り付けられ、適切な形を得るために乾かされます。

端が近くにトリミングされます。

ここで、留め具が切り取られ、そこにウェルト シームが作成されます。まず外側が準備されます。

次に中身。計画は比較的狭いウエストを作ることであるため、ホールドウェストはウエスト部分で非常にタイトです.ウエストにもブラインドウェルトを入れるので、アウトソールに隠れてしまうので、ウェルトを奥に入れる必要があります。

ダニエルは各穴にマークを付けます。最も弱いポイントであるつま先に特に注意してマークを付けます。それから千枚通しで穴をあけます。

次のステップは、ヒール補強材を準備することです。インソールと同じ素材の大きな革片は、割られ、削られ、やすりがけされ、ガラス張りされ、紙やすりで磨かれ、希望のサイズと厚さに仕上げられます。これは時間のかかる作業です。これはほぼ完成したもので、もう 1 つは切り取られたばかりです。補強材は、外側から内側の土踏まずを通って、ほとんど足の内側のボールまで続きます。 RTW シューズの通常のかかと補強材の約 2 倍の長さです。

最後にテストされました。

かかと補強材はペーストでブラッシングされ、アッパーとライニングの間もブラッシングされてから、補強材が所定の位置にセットされます。

次のラスティングは、いわば決定的なものです。そのため、靴が完成したときに靴型が簡単に滑り落ちるように粉末化されています。

最初に、ダニエルは補強材が少し滑り落ちる傾向があることを知っているので、一時的に背中を最後に留めます。次に、釘を離し、補強材を固定し、最終的な長持ちさせます。ペーストが乾燥すると、硬化剤が硬化します。ここでは、アッパーを配置するときに簡単に引っ張ることができるように、裏地の残りの部分がどのように使用されているかを見ることができます.

最初のラウンドを続けました。折り目が残らないように、革をハンマーでたたき、右に引っ張ります。完全に仕上げると、ここよりも釘の線がきつくなります。

今度は靴の前部分です。これがトウスティフナーとなるもので、ヒールスティフナーと同様の方法で準備されます。

ここでは、ライニングはすでに長持ちしています。つま先補強材が所定の位置に引っ張られ、内側に貼り付けられています。

補強材の繊維は圧縮されています。薄さを保ちながら、丈夫で耐久性があることを望みます。この時点では、耐久性を高めるために補強材はまだ湿っています。アッパーが長持ちする前に、補強材を乾かすために靴を少し休ませます。

補強材が乾いたら、ペーストとの密着性を高めるために研磨します。

靴のつま先の形が一致しているかどうかを確認する賢いツールです。これは、靴型を作成するときと、つま先の補強材を配置して厚さを等しくし、靴のつま先の形を同じにするときに使用されます。最初にツールを一方のつま先に押し付け、次に回転させてもう一方のつま先と比較し、違いを修正します。目の測定値は完全に信頼できるものではありません。足の指については、それらが正しいことを完全に確認する必要があります。

サイドバッカーは補強材よりも薄い革でできています。靴の端や表面に向けて適切に薄くするのは面倒なプロセスです。これにより、靴が完成したときにそれらが見えないように、しっかりと接着します。

所定の位置に配置されます(さらにトリミングされます)。

スティフナーが外側に貼り付けられたので、アッパーとつま先を適切に固定します。 Daniel Wegan は補強材の後部をそこに貼り付けないようにテープで留めています。これは、つま先補強材からの移行がより柔らかくなり、ここで挟まれるリスクが少なくなることを意味します。

持続中にシワが消えました。

靴全体が履かれたら、少し乾かします。靴型はここでは凹型になっているため、つま革を靴型と同じ高さに合わせるのが難しい場合があります。そのため、この部分に革の帯を張って、アッパーを最後まで押さえています。

ウェルトシームの時間。ウェルトの素材は分割され、少し薄くなります。

2 つのウェルトが切り取られ、さまざまな方法で準備されます。ここでは、ステッチになる小さな溝が彫られています.

余分な革は、ウェルト ステッチが作成される前にきれいに整えられるように切り取られます。

外側のどこに千枚通しが来るか印がつけられており、縫い目が整然と整頓されるのを助けます。

ハンド ウェルト プロセスの前に、靴は保護プラスチックで覆われています。これは、靴の外側でさまざまな方法で作業を開始するツールから保護するためと、後で使用される塗料やワックスの飛沫から保護するためです。ソールとヒールエッジ。ラッピングの前に、靴をスピリットに浸したスポンジできれいに洗います。そのため、プラスチックの下に汚れがたまり、化膿することはありません。

ダニエル ウェガンは、8 本の細い糸をピッチで撚り合わせたウェルト ステッチに麻糸を使用し、強度と耐久性を高めています。ピッチはまた、糸のくっつきをよくし、何年にもわたって緊張した後でも緩む可能性はほとんどありません.

ハンドウェルト。前述のように、つま先は縫い目が非常にきつくなるため、最も敏感です。そのため、この領域のホールドファストの内側に絡み合った糸で補強されています。ダニエルは前もって穴をあけていましたが、うまく針を通すために千枚通しを使う必要があります。針として彼は釣り糸を使用しています。

ウェルトが取り付けられると、アッパーに近づくようにトリミングされます。最初に明らかなように、鉛筆で印を付けます。ダニエルは、ブラインド ウェルトが作られるときにソールによって隠される部分であるウェストで、ウェルトを大幅にカットしています。

ウェルトは均等に打たれました。

ハンドウェルトが終了した後。バックはウェルトなしで他と同じタイプのステッチが使われています。ウエストの端が少し残っていますが、ソールのステッチをここで縫うには十分です.縫い目はアウトソールの下に隠れるので、特にタイトできちんとしている必要はありません。

不要な空洞を作らないようにするために、留め具の裏側には薄い革のストリップが詰められています。

腰を安定させるシャンク は、通常、金属または木材でできており、革の場合もあります。さまざまな理由から、ダニエル ウェガンは金属を好みますが、欠点は、金属が少し緩むときしみ始める可能性があることです。これを避けるために、シャンクは所定の位置にセメントで固定される前にテープで留められます

セメントで接合されたシャンクと、それを覆う革の最初の部分が作られます。これにより、ウエストがさらに強化され、面取りされた形状が強化されます。ダニエルは靴にチョークで絵を描いて、最初の革片を配置する場所に印を付けています。
次に、革をチョークの上に置き、少したたいて、切り取る領域を簡単に確認できるようにします。

ここでは、ピースが切り取られ、所定の位置に仮置きされています。シームレスな移行のために前面が削られています。

別の革片、少し短いものを取り付けます。ここでは、それをやすりで削ってから、目的の形状に研磨します。ウエストが非常にスリムな場合、ウエストが非常に高い位置に作られていると奇妙に見えるので、私たちが選択したベベルはもう少し抑制されています.

Gaziano & Girling は底の詰め物として、特注の靴にフェルトを使用しています。通常使用されるオプションは、フェルトまたはコルク プレートのいずれかであり、場合によっては革であり、それぞれに異なる長所と短所があります (RTW シューズで最も一般的なコルク ペースト は、手作業で溶接されたビスポークではあまり一般的ではありません)。

底面全体の充填が完了しました。

さて、アウトソールです。 Gaziano & Girling は、英国の皮なめし工場である Baker のオーク樹皮で鞣された靴底を使用しています。それらが所定の位置に接着される前に、エッジが少しトリミングされます.

ソールも装着前に色々と準備。ウエストは端に向かってしっかりと細くなっています。

厚みをコントロールしています。

ソールは接着されており、エッジと背面には非常に強い合成ネオプレンが使用されています。非常に高い接着力を必要としないフェルトの下の中間部分では、強度の弱いゴムベースの接着剤が使用されます。それらを再ソールするのが少し簡単になります。また、背面の外縁はすべて接着されていないことに注意してください。

ほとんどの場合、組み立てられる両面が接着されます。

ソールがはめ込まれたら、ハンマーでしっかりと押します。ここでウエストも形を整えます。

ダニエル・ウェガンは非常に鋭い角度のウエストアイロンを使用するため、ウエストの端に沿ってカットが行われるため、ウエストは端に向かって非常に薄くなります.

かかと部分の後ろには、木製のペグが打ち込まれ、ソールをインソールに取り付けます。中央にある 2 つの金属製の釘は、ソールを取り付けたときにソールを所定の位置に保つために配置されたばかりで、取り外されます。

ウェルトとアウトソールを取り付けるソール ステッチの時間です。余分な保護テープが端に沿って配置されています。

ウェルトは、ファッジ ホイールでステッチがあるべき場所に印を付けます。靴がかなり大きいのに、ソールのステッチがきつくてほしいです。使用されるファッジ ホイールは、12 spi (1 インチあたりのステッチ数) 用に作られています。

ダニエルはその後、ステッチを作成する場所を正確にマークします。この方法でスムーズな直線ステッチを作成する方が簡単です.

その過程で、使用されるナイフは頻繁に研がれます。よく切れるナイフは必需品です。

ソールのステッチを隠すフラップはカットされています。

ソールのステッチが入るチャンネルを切り出します。

ここでウエストのソールステッチを作ります。明らかに、ウエストをできるだけきつくする必要があるため、ここは非常にきつく、余裕がほとんどありません。ダニエルはここで 穴を下から開けて、タイトなブラインド ウェルトを作るときによくあるアッパーの千枚通しからの跡を避けるようにしています。前述のように、シームは非表示になるため、それほど正確である必要はありません。したがって、下からパンチするのに機能します。

ただ、正面は上から千枚通しが入っており、こちらの方がかなり縫い目がきついです。

フラップをチャネルの上に置くときに折り目が形成されるのを避けるために、最初に接着剤なしで押して、しばらくそのままにします。

丁寧な縫製。

フラップは再び折り返され、強力なネオプレン接着剤で接着され、再び平らになります。

押して打ち出しました。

ハンマーの後ろで軽くたたくと、エッジが圧縮されます。

ソールの縁がトリミングされています。

かかとの付け根となるスプリットリフトが用意されています。

靴に装着。

かかとは、外側のかかとをできる限りまっすぐできれいにするために、常に成形される革片で層ごとに構築されます。

また、かかとの外側部分をハンマーで圧縮して硬くします。かなり丁寧に作られていますが、全体的にダニエルは靴を作るのにほとんど力を使いません.彼は物事をスムーズに、ソフトに、そして繰り返し行うので、何が起こるかを簡単に確認でき、間違いを犯すことはありません。

製造プロセス中に絶えず行われているもう 1 つのことは、靴が完全に同一になるように互いに比較されることです。かかとが完全に同じになると、一晩中圧力がかかる可能性があります。 Daniel Wegan ベースの接着剤付きタブ。接着剤よりも耐久性は劣りますが、彼が好むため、白い縞模様はありません。ただし、底部の部分に強力なネオプレンリムを使用すると、適切に座らなければなりません。

ゴム製のトップピースが取り付けられています。

かかとが作られると、一晩圧力をかけられます。 Daniel Wegan はペーストでかかとを作ります。接着剤ほど強力ではありませんが、白い縞模様ができません。したがって、彼はそれを好みます。ただし、非常にしっかりと固定する必要があるため、トップピースには強力なネオプレン接着剤が使用されています。各レイヤーも釘付けです。

翌日、すべてを片付ける時が来ました。ここで彼はかかとがどこで終わるかをマークします.

胸はレイヤーごとにカットされています。

かかととソールの縁は、ヤスリがけされ、ガラス張りされ、ますます細かいサンドペーパーでやすりがけされます。

さらに比較。

彼はステッチの針で各ステッチの間を押し下げ、海をさらに引き締めます.

それからまたファッジホイールで。

トリミング。

ウエストアイロンでウエストのエッジを整えます。

こちらは腰鉄の角度がいかに鋭いかがわかります。

この段階で靴は完全に組み立てられており、残っているのは化粧品だけです。

かかとの底は、簡単にひびが入ってしまう木目の外側の部分を取り除きたいので、ガラス張りで研磨されています。

かかとにはガジアーノ&ガーリングの定番デコレーションネイルパターン、5本をチョイス。それらは少しハンマーで叩かれ、頭が切り落とされ、滑らかに研磨され、完全にハンマーで叩かれます。

アイロンを加熱して、石鹸と水をエッジに押し込みます。

エッジは石鹸でこすります。これで端を越えるということは、繊維が圧縮され、不規則性が現れ、時間内に修正できることを意味します。アイアンも滑りやすくなります。

こする、こする。

ソールエッジのエッジアイロン。これは、後で上部のリムを作成し、ソールのエッジを少し薄くするため、使用する最終的なエッジアイアンよりも少し幅が広くなっています。

グレインの外側部分はソールから離れてガラス張りになっています。

かかとの胸の下にアクセスするためのスクレーパー。

やすりがけ.

ソールはマスキングテープでテープで留められており、汚れたときや緑青が作られるときにエッジを保護します.

ソールエッジ染料が起毛されています。

塗料はホットアイロンで加熱されます。

ウェルト エッジの上のリムは彫り出されています。最後のエッジアイアンでさらに際立ちます。

ワックスをこすりつけ、通常の靴磨きとテレビン油をこの層に追加します。すべてが簡単に溶けて革に浸透するためのテレピン油。

加熱した。

また、ウェルトの上部はワックスがけされ、その上をホット ファッジ ホイールが走ります。ワックスは美観だけでなく、保護もします。

ここの左側にあるあなたが2段階でどのように作られているかを見ることができる、少し薄いエッジアイアンの時間です。

正しく行われた場合の最終結果は次のようになります。この細かいディテールは、ソールのエッジをよりすっきりとした印象にしますが、比較的うまく行うのは困難です。

これは、ほぼすべてのクラシック シューズに見られる一連の小さなストロークであるヒールの装飾です。

プラスチックの保護カバーが切り取られています。プラスチックを簡単に切り取るだけでなく、靴に残った部分が少し収縮して消えるように、加熱したナイフで作られています。

保護プラスチックのおかげで、色が薄くてもアッパーをきれいにできます。

Neus Benavent は、ロンドンの Savile Row にある Gaziano & Girling の Fagship Store のストア マネージャーであり、パティーナの多くも手がけています。彼女は、キャニオンと呼ばれるダークブラウンの緑青で私の靴をペイントします.まず、革がどのように反応するかを確認するために、靴の裏の内側の色を常にテストしています。また、革の特徴を判断できるように、少し乾かします。

これで、最初のベースレイヤーがほぼ完成しました。

シェーディングが完了すると、このステップの前にさらにベースレイヤーが作成され、最終的な色合いが得られ始めます。ブラシの色は常にほとんど使用されず、絵の具に浸すことさえせず、そこにブラシをかけたペーパー タオルから染料を取るだけです。小さな素早いストロークでペイントされています。

緑青が完成したら、テープをソールから剥がし、私が望むニュートラルなソール仕上げを行います。ゴムと呼ばれるクリームで処理されており、硬く、半光沢のニュートラルな表面になっています。

ヒールとソールの底に沿って暗いエッジが作成され、エッジとソールの間の移行がよりきれいになります。

その後、クリームとワックスで靴を磨きます。靴型が引っ張られ、中敷きが挿入され、また、つま先のくぼんだタップが取り付けられます。その後、靴は完成です。
1 週間ほどで、このシリーズの最後の投稿が公開され、完成した靴の大規模な写真とそのすべての要約が掲載されます。


One of the best and most comprehensive guides to bespoke shoe making, Bravo!
Great photo essay. Great shoes. Great technique all the way through
Peter and DWFII: Big thanks!
Without doubt the most interesting and informative review on shoe making I’ve ever read and most likely will ever read. An absolute credit to all involved
Well done Daniel and co, craftmansship as it best 🙂
Carl 1955: Thank you very much!
Janne Melkersson: Yeah it sure is!
Amazing report and thank you so much for posting ! It’s really incredible the work that goes in to a bespoke pair of shoes …
Amazing and in depth post.
Andre and Mark: Thanks a lot!
A very fine post indeed
“Now the upper leather is sprayed with a mixture of water and softener,”
@SHOEGAZING CAN U PLEASE WHAT IS THE NAME OF THIS SPRAY ???
What a great article congratulations to you and the legends Gaziano and Girling